win7系统分区教程
- 分类:Win7 教程 回答于: 2020年02月11日 12:00:05
win7系统下怎么执行磁盘分区呢?硬盘是我们电脑中的重要存储设备,将硬盘划分成不同的逻辑区域就是磁盘分区,有主分区、扩展分区和非DOS分区。接下来,小编就给大家介绍一下磁盘分区的操作步骤。
工具/原料:
系统版本:windows7
品牌型号:联想小新air12
方法/步骤:
win7系统分区教程
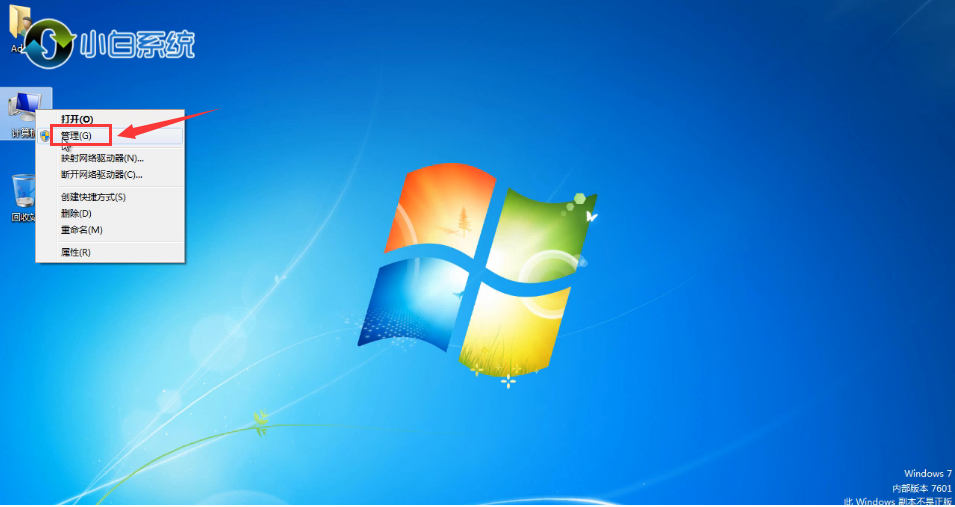
1、右键点击“计算机”,菜单栏选“管理”。

2、进入界面后选择左侧“磁盘管理”,然后右键点击需要调整分区的磁盘菜单栏选择“压缩卷”。

3、在输入压缩空间量里面输入需要调整分区的容量,然后点击“压缩”下一步。

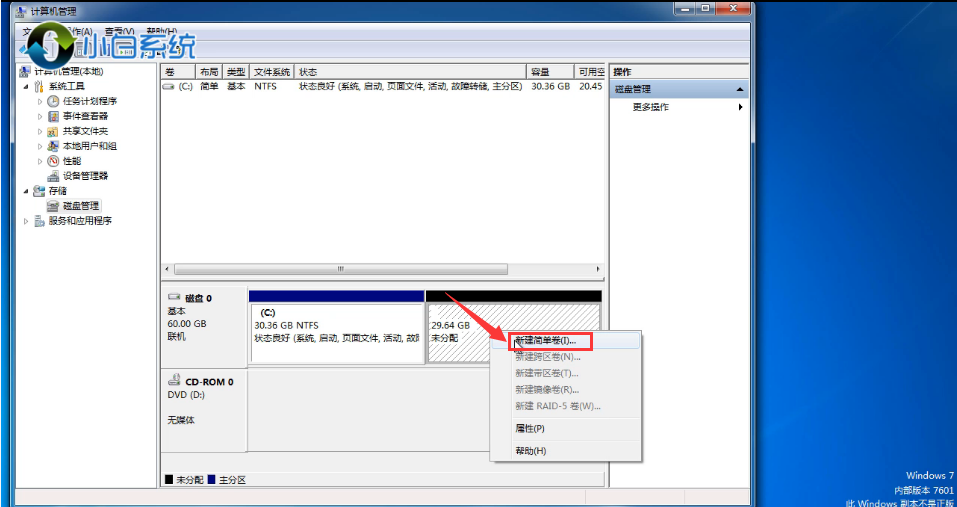
4、出现一个未分配分区,右键点击选择“新建简单卷”。u

5、出现如图下所示,点击“下一步”。

6、下一步。

7、下一步。

8、点击“完成”。

9、win7系统分区完成。

总结:
关于win7系统分区介绍到这就结束了,希望能帮助到大家。
 有用
12
有用
12


 小白系统
小白系统


 1000
1000 1000
1000 1000
1000 1000
1000 1000
1000 1000
1000 1000
1000 1000
1000 1000
1000 1000
1000猜您喜欢
- 装机吧工具如何安装win7系统..2022/10/04
- win732安装系统没有网络怎么办..2021/09/07
- 技嘉h510装win7系统教程2023/01/26
- Win7精简版:高效节省空间,精简技巧大揭..2024/06/21
- 联想笔记本电脑怎样重装系统win7..2023/04/27
- 小编教你解决win7无法保存打印机设置..2017/11/03
相关推荐
- 电脑中毒,小编教你电脑中毒怎么办..2018/07/04
- U盘重装Win7系统:详细步骤指南..2023/12/12
- 安装win7官方原版镜像下载2017/08/31
- 小编教你Ghost windows764位系统旗舰..2017/06/15
- qq远程控制,怎样进行远程控制制作步骤..2018/08/22
- win7安装版安装教程2022/05/24


 关注微信公众号


