电脑时间校准,小编教你怎么校正电脑时间
- 分类:Win7 教程 回答于: 2018年09月05日 14:10:00
相信很多日常电脑办公的朋友,对于电脑上面的时间都会有所关注的,但是最近却有一些朋友在反映说自己电脑上的时间好像不准,是不是电脑中毒了,自己根本没有调过这个时间,这个电脑时间应该什么调准呢?下面,小编给大家讲解校正电脑时间的方法。
刚刚购买的新电脑安装完系统后,时间都是调整好准确的,很少发生不准确的情况。但是最近就有用户说电脑显示的时间不准确,影响办公效率,有什么方法可以调整电脑时间?下面,小编跟大家介绍校正电脑时间的步骤。
怎么校正电脑时间
点击任务栏上的时间,点击“更改日期和时间设置”

校准时间图-1
切换到“Internet时间”,选中“与Internet时间服务器同步”,选择“time.windows.com”。

时间图-2
方法二:
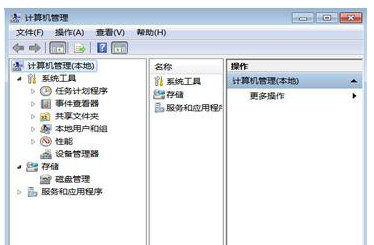
右键单击“计算机”,选择“管理”

时间图-3
双击“服务和应用程序”,再双击“服务”,找到“Windows Time”,右键单击后选择“属性”,会弹出“windows time的属性“窗口

电脑时间图-4
将启动类型改为“自动”,点击“确定“即可。
方法三:
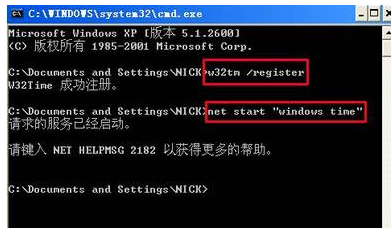
打开“命令行“,输入“w32tm/register”,回车;
在提示“w32Time成功注册“后,再输入net start”windows time“,回车,之后就会提示服务启动成功

电脑时间图-5
以上就是校正电脑时间的方法。
 有用
26
有用
26


 小白系统
小白系统


 1000
1000 1000
1000 1000
1000 1000
1000 1000
1000 1000
1000 1000
1000 1000
1000 1000
1000 1000
1000猜您喜欢
- 如何重装电脑win7系统2023/02/28
- 最全面系统之家重装大师重装win7教程..2019/05/25
- 重装win7系统费用多少?2024/01/20
- 固态硬盘有什么好处与缺点?..2019/07/30
- visio2007密钥,小编教你visio2007激活..2018/04/12
- Windows7如何激活2024/08/27
相关推荐
- 从Win7升级至Win8,让你的电脑焕发新生..2023/11/09
- 新手必看:在线一键重装系统win7快速指..2024/09/25
- 优化Win7共享设置,提升文件共享效率与..2024/07/30
- win7如何重装系统教程2022/10/14
- 蓝屏代码0x000007b解决方案:排查引导错..2024/10/11
- pe重装系统步骤win7系统2022/09/28


 关注微信公众号


