u盘重装系统教程
- 分类:U盘教程 回答于: 2022年05月05日 09:57:00
相信有的朋友去电脑城组装电脑的时候,会看见装机人员安装系统不再需要光驱,而插入U盘安装系统,U盘安装系统方便了许多,电脑光驱容易坏,使用寿命短,一般老电脑的光驱都不怎么好使,而U盘就不需要光驱就能安装,只要有完好的USB接口就行,U盘就是携带也方便许多,U盘的体积比系统安装光盘小得多。接下来为大家提供用u盘装系统的操作全程图解。
工具/原料:
1、操作系统: windows 10
2、品牌型号:联想电脑
3、软件版本:小白一键重装系统 12.6.49.2290 下载地址:http://www.01xitong.com/
具体步骤如下:
1、下载安装小白一键重装系统,安装好后打开软件:

2、备份女孩U盘的资料,不然会格式化,插入电脑中,下图所示:

3、在小白软件界面中选择制作U盘,然后点击开始制作,下图所示:

4、选择win10 64位系统,然后点击开始制作,下图所示:

5、已经备份好了资料,可以直接点击确定格式化U盘制作工具,下图所示:

6、电脑自动下载系统包和制作工具,等待即可,下图:

7、自动制作成功,提示出现,点击取消,下图所示:

8、把制作好的U盘插到需要重装系统的电脑上,下图所示:

9、重启电脑,热键进入启动界面,在Boot Menu界面选择 USB字眼的启动选项,方向键上下选择按回车键确定,参考下图:

10、在这一步选择第一项启动win10x64位PE,然后回车进去,下图所示:

11、加载完成后弹出小白装机工具,选择系统,点击安装,下图所示:

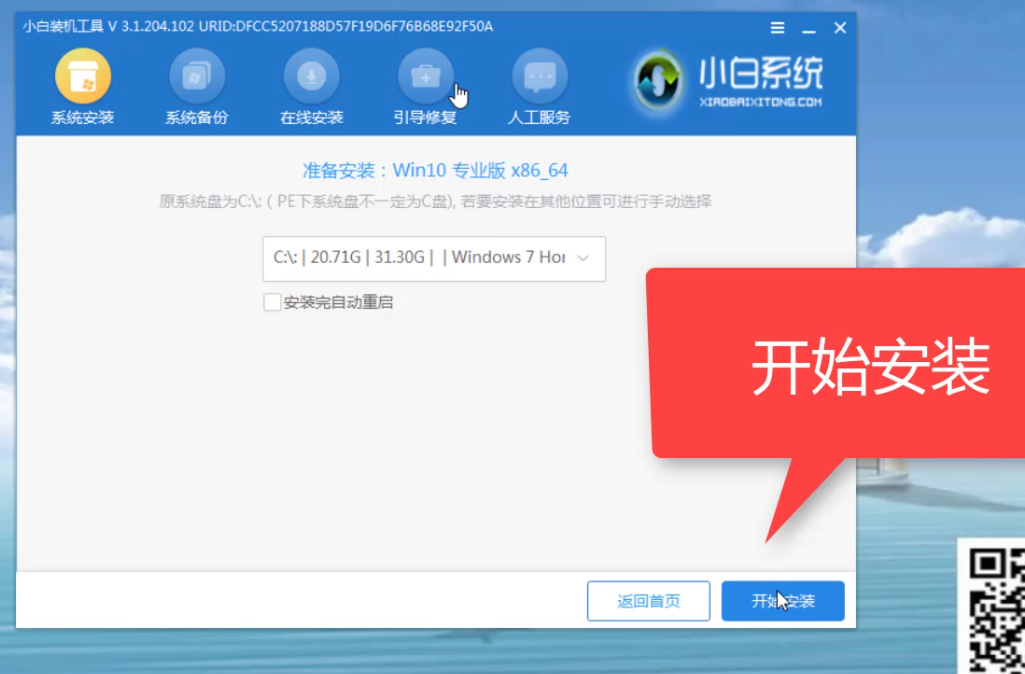
12、选择安装的系统盘C,然后点击开始安装,下图所示:

13、出现的提示,点击确定,下图所示:

15、正式开始安装系统,耐心等候,下图所示:

16、安装完成后,立即重启,下图所示:

17、接着开始正式加载系统,期间会多次自动重启,然后进入系统就安装成功了,下图所示:

以上就是使用U盘工具安装系统的教程,如果你的电脑是黑屏或者系统丢失文件都可以通过这个方法重装哦。
 有用
26
有用
26


 小白系统
小白系统


 1000
1000 1000
1000 1000
1000 1000
1000 1000
1000 1000
1000 1000
1000 1000
1000 1000
1000 1000
1000猜您喜欢
- 练习如何用u盘重装系统教程..2020/10/27
- u盘启动盘制作的教程2023/01/18
- 如何制作u盘启动盘_小编教你怎么制作..2017/12/11
- 大白菜U盘启动的方法2023/01/01
- 电脑不识别U盘?揭示原因与解决方法的专..2024/06/03
- 轻松快捷的U盘重装XP系统2023/10/29
相关推荐
- 如何设置bios,小编教你如何将U盘启动..2018/01/16
- 小马u盘重装系统教程:轻松解决电脑问题..2024/03/25
- 联想thinkbook怎么设置u盘启动..2021/07/22
- win10电源已连接适配器未充电怎么解决..2021/02/20
- u盘pe启动盘制作,小编教你如何在20分..2018/01/08
- U盘安装系统的步骤2023/12/14


 关注微信公众号


