联想笔记本bios怎么进入调整启动项
- 分类:U盘教程 回答于: 2021年11月22日 12:33:00
很多时候我们需要进入BIOS设置管理员密码、设置U盘启动等等操作,而不同品牌的电脑进入BIOS的方法是不一样的,下面就和大家详细讲解电脑进入联想bios设置启动项的方法吧。
1、开机到Logon时,快速按下Del键(有的可能为F8键),就会进入BIOS。

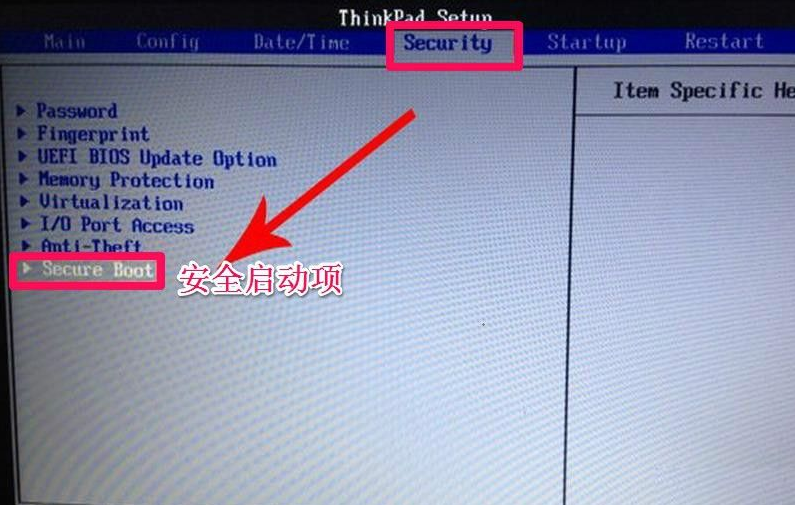
2、进入BIOS后,先选择“Security(安全)”,找到“Secure Boot”,按Enter进入子项。

3、在子项中,将Secure Boot的值设为“Disabled”,要启用传统方式 ,必须关闭这个安全启动项,Disabled为关闭的意思。

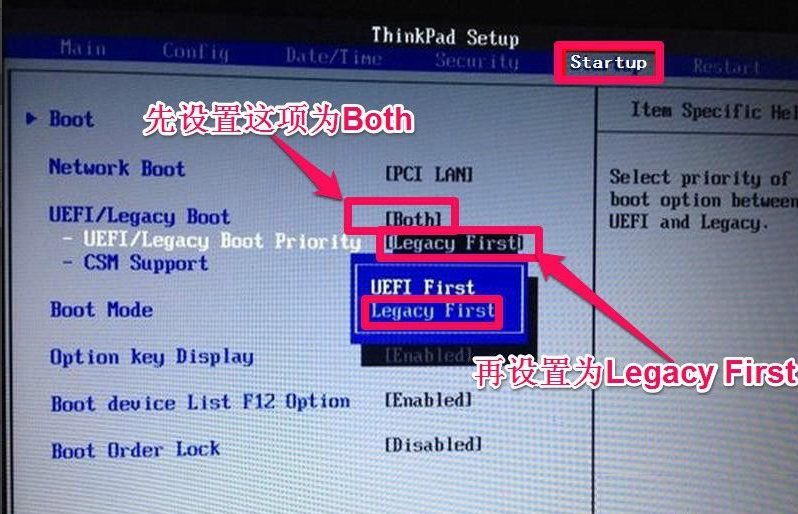
4、然后再到“Startup”,将“UEFI/Legacy Boot”设置为"Both",设置之后,会弹出UEFI/Legacy Boot Priority项,将其值设置为“Legacy First”。

5、然后再找到Boot,进入子菜单,

6、选择USB-HDD(U盘有时显示的是名称,如USB:Kingn......),用+键或-键,把此项移到最上面第一项,即为第一启动。
如果用光盘启动,选择图上第五项,移到最上面即为第一启动,光盘一般带有CDROM,DVD-RAM等等之类词。
设置好后,按F10进行保存设置,重启电脑后,即可自动从U盘或光盘启动。

以上内容就是和大家分享的联想电脑启动项在bios设置的过程了,如果大家对联想电脑的bios不熟悉的话可以看看这篇文章是如何操作的。
 有用
26
有用
26


 小白系统
小白系统


 1000
1000 1000
1000 1000
1000 1000
1000 1000
1000 1000
1000 1000
1000 1000
1000 1000
1000 1000
1000猜您喜欢
- 一分钟了解联想如何设置u盘启动..2021/03/26
- Msdn官网win10 1511版哪个是专业版..2022/03/07
- 小白装机软件制作u盘启动pe重装xp教程..2021/11/14
- U盘启动盘制作工具教程,小编教你制作..2018/05/03
- 小白U盘重装win8系统教程2017/10/18
- 系统u盘怎么恢复成普通u盘使用..2022/05/17
相关推荐
- 手把手教你一键U盘装系统2020/05/15
- 怎样制作U盘重装系统:小白必学的详细步..2024/10/09
- 小白教你进入bios2017/09/27
- 快速图解制作u盘系统教程2024/10/07
- 电脑U盘重装系统:简单易懂的步骤指南..2024/02/28
- 小白演示戴尔主板bios设置u盘启动方法..2021/11/07


 关注微信公众号


