win7 32位系统ghost安装教程
- 分类:教程 回答于: 2016年11月12日 00:00:00
微软公司宣布对windows xp系统停止更新以后,win7 32位系统ghost成为了最多网友使用的系统。小编自己也一直都在使用win7 32位的系统gho,发现win7 32位系统ghost确实不错。为了让网友们都能使用w732位系统,小编就把win7 32位系统ghost安装教程分享给大家吧。
1.U盘的制作和BIOS完成后,将电脑重新启动。
2.重启后进入口袋PE选择界面时,选择第一项“启动口袋U盘win2003PE维护系统”,并按下回车键(即键盘上的enter键)。如图1

win7 32位系统ghost安装教程图1
3.双击打开桌面上的“口袋PEGhost”。如图2

win7 32位系统ghost安装教程图2
4.选择你要安装的磁盘,然后找到你下的win7 32的镜像文件。如图3

win7 32位系统ghost安装教程图3
5.选择我们要重装系统的位置,点击“确定”。如图4

win7 32位系统ghost安装教程图4
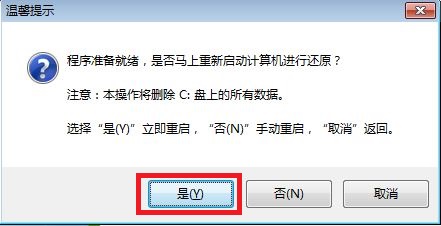
6.然后点击确定,在弹出的对话框里选择“是”。(安装系统前事先把c盘重要的数据拷贝到其他磁盘)如图5

win7 32位系统ghost安装教程图5
7.接着出现系统还原进度界面。如图6

win7 32位系统ghost安装教程图6
8.系统还原完成后,电脑重新启动,请耐心等待,WIN7重装将会进行全自动安装。直到安装激活完成。
以上的全部内容就是小编为网友们带来的win7 32位系统ghost安装教程了,win7 32位的系统gho不仅非常好用,而且安装系统也很简单,不会麻烦。所以网友们都动手去安装windows7 32位系统吧,在安装过程中遇到任何问题,都可以留言来咨询小编哦。
 有用
98
有用
98


 小白系统
小白系统


 1000
1000 1000
1000 1000
1000 1000
1000 1000
1000 1000
1000 1000
1000 1000
1000 1000
1000 1000
1000猜您喜欢
- 笔记本win7怎么重装系统步骤..2022/04/28
- 电脑定时关机设置攻略2023/12/25
- 戴尔笔记本重装系统xp步骤教程..2022/07/18
- 联想笔记本电脑重装系统怎么操作..2023/03/06
- 一键重装系统win10 32位教程2016/11/02
- win8系统降级win7图文教程2017/02/14
相关推荐
- 2023年电脑主板排名及选购指南:提升游..2024/08/30
- 云操作系统有哪些2022/03/09
- xp系统安装版64位下载安装教程..2022/06/18
- 金山一键重装下载2016/10/22
- d盘重装系统怎么设置2023/02/17
- 火狐浏览器官网:探索更快速、安全和个..2024/01/31


 关注微信公众号


